


INTRODUCING THE SMITH PORTAL
What is the Smith Portal?
The Smith Portal is a customized web site from which Smith students, faculty, and staff
can access many Smith web-based
services and information sources from a single sign-on. The portal can be used in any location on- or off-campus with a working Internet connection.
When a user goes to the portal log-in page (https://portal.smith.edu) and enters a valid Smith network username and password, the portal software:
- Authenticates their sign-on credentials
- Retrieves information about their role (student, staff, or faculty), software access rights, and display settings from the portal database
- Displays a customized version of the portal for that user.
From the portal, authenticated users can access web-based services, such as Workday, Moodle, and Lynda.com training courses, without having to sign
on to each of these services separately. This reduces the need to remember multiple links, software start-up protocols, and passwords, so users can work more efficiently.
Note that users always have the option to access these services from outside the portal if they prefer. The only exception is Lynda.com online training, which can be accessed only via the portal.
Important Security Information
Please read the following security information before you begin using the portal:
- Remember to always LOG OUT of the portal when you're done!
To sign out, click the Log Out link at the top right of the portal window. This step is essential for protecting your privacy and the security of the Smith network.

Be sure to click the Sign Out link whenever you finish using the portal, especially if you are accessing it on a public computer.
- We recommend using Google Chrome or Mozilla Firefox to access the Smith portal on a Windows computer, and Chrome or Safari on a Mac.
However, Chrome or Firefox may currently be set to automatically store your portal username and password, which is a serious security risk.
Please follow the steps below to check your browser settings and change them if necessary:
In Firefox:
- Open the Tools menu and choose Options.
- In the Options window, click the General tab.
- In the Startup area, make sure that When Firefox starts is set to Show my home page or Show a blank page.

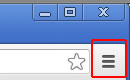
- Open the Chrome menu by clicking the 3-bar icon in the upper right corner of the Chrome window (shown below) and choose Settings.
- In the Settings window, scroll to the bottom and click Show advanced settings to see more settings.
- Under Privacy, click the Content settings button.
- Make sure that Cookies is set to Keep local data only until I quit my browser, then click OK.
- Open the Tools menu and choose Options.
Other Important Points
Please note the following important points about using the portal:
- A few services accessible via the portal, including Smith Mail, Banner INB, Cognos, 25Live, and Teamworks, still require an additional log-on. These systems may eventually be converted to single-sign-on access.
- Your portal session will time out after 8 hours. If your session times out, simply log on to the portal again.
- Your LinkedIn Learning online training account can be accessed only via the portal.
- Banner INB users: If your browser tells you your Java plug-in is out of date, DO NOT install a new version. Instead, click Continue and accept any alerts that follow.
- Remember to always LOG OUT of the portal when you're done!
Navigation and Use
Begin at the portal log-in page: https://portal.smith.edu
After
signing on with your Smith network username and password,
the portal checks Banner, assigns you one or more roles (student,
faculty, or staff), and displays the portal tabs for
your particular role(s).
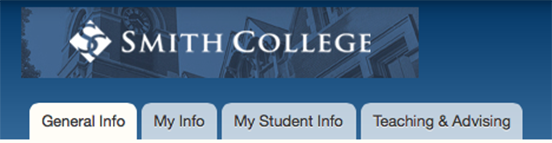
Each tab contains rectangular areas called portlets that are used to organize and display
related information. Click on any tab to see its contents:
- The General Info tab displays for all users. It
contains links that are relevant to all people in the Smith community.
- The My Info tab displays only for Smith staff and faculty.
It contains work-related links, Human Resources links, and links to personal information pages within BannerWeb.
- The My Student Info tab displays
for all Smith students. It contains portlets for
Academics, Student Employees, and an index of Student Resources available at
Smith.
- The Teaching and Advising tab contains links for Academics, Faculty Resources, and Faculty Information.
Remember, always click on the Log Out link at the top right of the portal window to sign out when you're done!
Reporting Problems
To report
a problem or error, contact the IT Service Center at extension 4487 or send email to ithelp@smith.edu.
