


TRANSFERING SMITH MAIL TO ANOTHER ACCOUNT USING THUNDERBIRD
Using an IMAP client like Thunderbird, you can set up multiple accounts and copy all or some of the messages in your Smith Mail account to any other personal account.
You must first enable IMAP access for both accounts and configure Thunderbird to access both accounts, then you can begin the transfer.
Note: These instructions will work fo most email providers (Yahoo Mail, Hotmail, etc.) If Thunderbird does not find your settings automatically, you will have to enter them manually. If you do not know the correct settings for your personal account, you will need to obtain them from your account provider. Your Smith account (from which messages will be copied) is called the source account and your personal account (that will receive the messages) is called the target account.
Setting up IMAP Access in Smith Mail
You must enable IMAP access in both the source and target accounts before you can perform the transfer process:
- Go to Smith Mail (http://mail.smith.edu) and log in with your username and password.
- Click the Options button (gear icon) at the top right of the Smith Mail page and choose Mail Settings.
- Click the Forwarding and POP/IMAP tab.
- In the IMAP Access section, choose Enable IMAP.
- Click Save Changes.
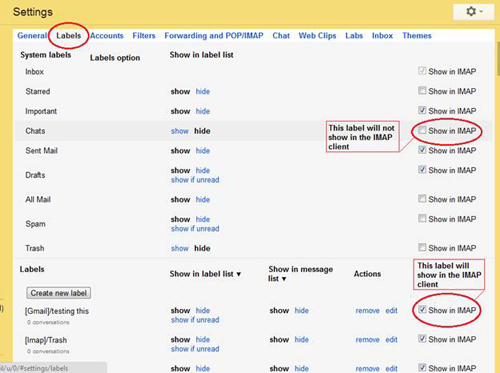
Source account only: Specifying which labels to transfer to the target account
After you enable IMAP for the source email account, if you don't want the entire account transferred, you can select which labels will be visible in Thunderbird (the intermediary IMAP client), as follows:
Note: You cannot choose to hide the Inbox label.
- Click the gear icon at the top right of the Smith Mail page and choose Mail Settings.
- Click on the Labels option.
- Locate the Show in IMAP checkbox at the far right of each label name.
- Place a check in the box beside each label you want to appear in the IMAP client, as shown below. Do not check the box for any label you do not want to appear in the IMAP client
Using Thunderbird to Transfer Email
- If you don't already have Thunderbird installed on your computer:
- Go to: http://www.mozilla.org/en-US/thunderbird/
- Download the Thunderbird Setup program to your desktop.
- Double-click on the Thunderbird icon to launch the installer.
- Go to: http://www.mozilla.org/en-US/thunderbird/
- Open Thunderbird. In the first pop-up window, choose Skip integration.
- In the next pop-up window, choose Skip this and use my existing account.
- In the Mail account Setup window, for the source account:
- Enter your name, Smith Mail address, and password.
- Thunderbird will automatically attempt to find mail server settings. When it’s done, the screen should look like this (with your username):
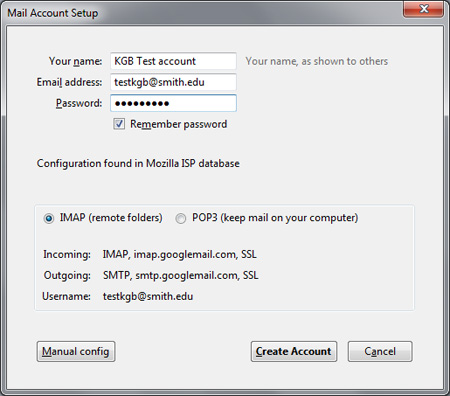
- If you do not want the account password to be saved, uncheck the Remember password box.
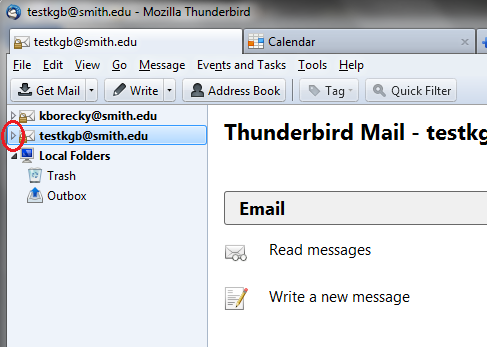
- Click Done. The account will appear in the left column.
- Enter your name, Smith Mail address, and password.
- Under Create a New Account, choose Email.
- In the pop-up window, choose Skip this and use my existing account.
- Enter the information for your personal email account, then click Done.
- You should now see your source account and your target account listed in the left menu bar. Proceed to transferring mail.
Transferring Mail from the Source Account to the Target Account
Please be patient as transferring messages could take hours/days depending on how much mail you have. Start with a simple folder of 100 messages.
- Click the Get Mail button, select Get New Mail For, and select the source email account.
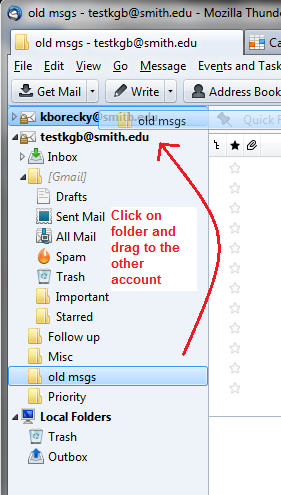
- Click on the small arrow to the immediate left of the source account name to expose the list of folders for that account, as shown below.
- Locate each folder you wish to transfer to the target account, click on it, and drag it onto the target account name.
- To verify the transfer, click the dropdown arrow to the left of the target account to expose the folder structure.
- You may also drag individual messages onto folders in the target account.
- When you are satisfied, you can remove the source account from Thunderbird if you wish:
- Right-click on the source account name in the left panel and choose Settings.
- On the Account Settings – yourname@smith.edu page, click on Account Actions at the bottom and choose Remove Account.
- Right-click on the source account name in the left panel and choose Settings.
