


DIRECT PRINT: SET UP PRINTERS ON A SMITH COMPUTER
This option allows a user to send a print job to a specific MFD or HP printer from a Smith-assigned computer. Once sent, the job prints immediately. Before users can print directly to a specific printer, users must install the corresponding printer on their Smith computer. Instructions for this are detailed below and only apply to setting up direct printing on Smith-assigned computers.
IMPORTANT NOTE:
Users should remove the Xerox MFDs and any HP printers (printer queues on your computer) that were installed prior to the Jan 8, 2024 printing system upgrade. They will stop functioning on Feb 8, 2024. See detailed instructions below for your computers operating system.
TROUBLESHOOTING TIPS
If you are having trouble printing directly to a printer device e.g. your print job is not showing up at the printer after waiting the normal amount of time, first shut down and restart the computer. If restarting the computer doesnt resolve the issue, ensure you have the most recent printer installed by removing the existing printer and installing the current printer available. See detailed instructions below for your computers operating system.
WINDOWS OS INSTRUCTIONS
Remove an Existing Direct Printer on Windows
To remove existing direct printers, follow the steps below. Previously installed printers could be out of date and removing them is the easiest way to ensure you do not have older versions.View the list of installed printers:
- Windows 10: Select Windows Start
 , then select Settings
  > Devices > Printers & scanners
 - Windows 11: Select Windows Start
 , then select Settings
 > Bluetooth & devices > Printers & scanners
- Windows 10: Select Windows Start
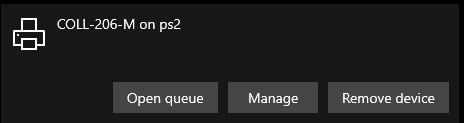
Find the name of printer you want to remove, select it, then select Remove device. (On Windows 11, select Remove)
- To remove older printers that are from before 1/8/2024, locate printers that are listed as being on pcps1, ps1 and ps2 then select and remove each printer.
Install a Printer for Direct Printing on Windows
Determine the print server you need to connect to based on where the printer is located:
- For buildings alphabetically from 10 Prospect Street to Fort Hill, the server is \\tps1
- For buildings alphabetically from Garrison to Ziskind, the server is \\tps2
-
Next to the Windows icon in the lower left corner of the desktop, click in the Windows search field. Enter the name of the print server determined in Step 1, either \\tps1 or \\tps2
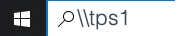
A list of printers available on that print server will display. - From the list, locate the name of the MFD or HP printer you wish to print to. (If you do not see the printer you are looking for, try the other server, either \\tps1 or \\tps2 )
- Double-click the printer icon and wait for the installation to complete. DO NOT double-click multiple times. WAIT for the installer window to pop up, which may take several minutes.
The printer will now appear as an option when printing from applications.
MACOS INSTRUCTIONS
Remove an Existing Direct Printer on macOS
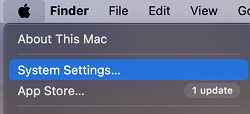
- View the list of installed printers: Select the Apple icon, then select System Preferences (or System Settings)
The settings window will display. - From the list of settings on the left, select Printers & Scanners. Scroll down if you dont see this option.
- Find the name of printer you want to remove, select it, then select Remove Printer
Install a Printer for Direct Printing on macOS
- Open Finder and select Applications from the list of folders.
- From the list of applications, double-click Smith College Self Service to open the application.

A new window will open. - From the left menu, select Printer Queues. (If you dont see the Printer Queues option, expand the Browse menu by selecting the down arrow to the right of Browse.)
A list of printers will display. Printer queues are named and listed in order by street number and/or building name followed by room/floor. - From the list of printers, locate the HP printer or MFD in your area and select Install.
- The printer will now appear as an option when printing from applications.
